
Best Books on Transitioning from Go to C# to Buy in July 2026
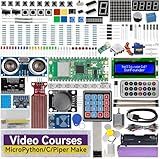
SunFounder Raspberry Pi Pico W Ultimate Starter Kit with Online Tutorials, RoHS Compliant, 450+ Items, 117 Projects, MicroPython, C/C++ (Compatible with Arduino IDE)
-
MASTER IOT WITH 450+ COMPONENTS AND 117 ENGAGING PROJECTS!
-
LEARN FROM EXPERT PAUL MCWHORTER THROUGH 27 INTERACTIVE TUTORIALS!
-
EXPERIMENT FREELY WITH MULTI-LANGUAGE SUPPORT FOR DIVERSE CODING PATHS!


SwitchBot Smart Switch Pusher with Remote - No Wiring, Control with APP, Timer and Bluetooth Remote, Add SwitchBot Hub Mini to Make it Compatible with Alexa, Google Home, IFTTT (White)
-
UNIVERSAL COMPATIBILITY: CONTROLS ANY ROCKER SWITCH OR BUTTON EASILY.
-
CONVENIENT BLUETOOTH REMOTE: CONTROL YOUR DEVICES WITHOUT YOUR PHONE.
-
AUTOMATE WITH TIMERS: SCHEDULE DEVICES TO OPERATE AUTOMATICALLY, HASSLE-FREE.
Microsoft Access 2010 VBA Macro Programming
Educational Insights Artie 3000 The Coding Robot: Drawing STEM Robot Toys For Kids Boys And Girls, Classroom Must Haves, Ages 7+
-
BRING CODING TO LIFE: ARTIE TURNS CODE INTO COLORFUL DRAWINGS!
-
LEARN CODING EASILY WITH BUILT-IN TUTORIALS FOR ALL SKILL LEVELS!
-
SAFE AND SECURE: NO INTERNET NEEDED, CONNECT DIRECTLY VIA WI-FI!
R Graphics Cookbook: Practical Recipes for Visualizing Data
Beginning GIMP: From Novice to Professional (Expert's Voice in Open Source)
- SAVE MONEY WITH AFFORDABLE USED BOOKS IN GREAT SHAPE!
- HIGH-QUALITY PRE-OWNED BOOKS FOR ECO-FRIENDLY READING.
- DISCOVER HIDDEN GEMS AT UNBEATABLE PRICES-SHOP NOW!
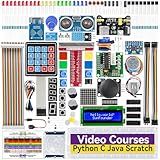
SunFounder Da Vinci Starter Kit for Raspberry Pi 5 4B 3B B+ 400, Zero 2 W, Python C Java Scratch Node.js, Online Tutorials & Video Courses for Beginners & Experts (Raspberry PI NOT Included)
-
300+ COMPONENTS & 150+ PROJECTS FOR ENDLESS CREATIVITY!
-
EXPERT-LED TUTORIALS SIMPLIFY RASPBERRY PI LEARNING JOURNEY.
-
VERSATILE KIT SUPPORTS 5 LANGUAGES FOR DIVERSE PROGRAMMING SKILLS!
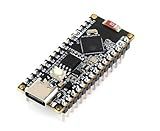
ESP32-S3-Nano Microcontroller Development Board with Pre-Soldered Header, Based on ESP32-S3R8 Chip, Integrates 2.4GHz W-i-F-i and Blue-Too-th LE Dual-Mode Compatible with Arduino Nano ESP32
-
POWERFUL ESP32-S3R8 CHIP FOR HIGH-PERFORMANCE APPLICATIONS.
-
DUAL-MODE CONNECTIVITY: WI-FI AND BLUETOOTH FOR VERSATILE PROJECTS.
-
EASY PROGRAMMING SWITCH BETWEEN ARDUINO & MICROPYTHON FOR FLEXIBILITY.
If you're looking to switch from the Go programming language to C#, there are a few important aspects to consider. Here's an overview of the process:
- Syntax Differences: Go and C# have different syntaxes. While Go favors simplicity and readability with its C-like syntax, C# follows a stricter object-oriented approach based on the C language. It's essential to familiarize yourself with the syntax and coding conventions of C#.
- Language Features: C# offers features not found in Go, such as garbage collection, a rich standard library, and extensive support for object-oriented programming. Explore these features to leverage C#'s capabilities effectively.
- Tooling and IDEs: Go and C# have their respective tools and integrated development environments (IDEs) to aid development. Popular options for C# include Visual Studio, Visual Studio Code, and JetBrains Rider. Install and configure the IDE that suits your requirements.
- Learning Resources: Several online resources like tutorials, documentation, and books are available to learn C#. Take advantage of these resources to get up to speed quickly and understand the intricacies of the language.
- Translating Code: If you have existing Go code that you want to migrate to C#, translating the codebase can be a manual process. Start by understanding the functionality and logic of your Go code and then rewrite it in C# using the appropriate C# constructs.
- Libraries and Frameworks: Depending on the projects you're working on, you might need to familiarize yourself with the popular libraries and frameworks in the C# ecosystem. Research and understand the equivalents of your favorite Go libraries in the C# world.
- Community Support: Engage with the C# community to ask questions, seek guidance, and share your experiences. Online forums, discussion boards, and developer communities are excellent resources to connect with fellow C# developers.
- Practice: The best way to solidify your skills in C# is through practice. Build small projects, experiment with different language features, and challenge yourself with coding exercises. The more you practice, the more comfortable you'll become with C#.
Remember, switching between programming languages requires patience and dedication. Take it step by step, embracing the learning process, and gradually you'll become proficient in C#.
How to debug a C# program?
To debug a C# program, you can follow these steps:
- Set breakpoints: Place breakpoints on the lines of code where you want the debugger to pause the execution of the program. You can do this by clicking in the left margin of the code editor or by pressing F9.
- Start debugging: Press F5 or click on the "Start Debugging" button (usually a green arrow). This will launch the program in debugging mode.
- Run the program: Execute the program and the debugger will pause the execution when it reaches the breakpoints.
- Examine variables and code flow: While the program is paused, you can inspect the values of variables, step through the code line by line, and analyze the code flow. The debugger will show you the current state of the program, allowing you to understand what's happening at each step.
- Step Over (F10): Executes the current line and moves to the next line. If the current line contains a method call, it will execute the entire method without stepping into it.
- Step Into (F11): Executes the current line and moves to the next line. If the current line contains a method call, it will step into the called method, allowing you to debug it.
- Step Out (Shift+F11): Executes the remaining lines in the current method and returns to the caller method.
- Inspect exception details: If an exception occurs, the debugger will pause the program and show you the exception details, including the stack trace. You can examine the exception details to understand why it occurred.
- Modify and test code: While debugging, you can make changes to the code and the debugger will apply them on-the-fly. This allows you to test different scenarios, fix issues, and verify the behavior of your program.
- Continue execution: To resume the program's execution after a breakpoint or exception, you can use the "Continue" button or press F5.
- Analyze debug output: The debugger also provides output windows where you can analyze additional information, such as the output of Console.WriteLine statements or the contents of the call stack.
By following these steps, you can effectively debug your C# program and identify and fix any issues or errors.
What are the differences between Go interfaces and C# interfaces?
There are several differences between Go interfaces and C# interfaces:
- Syntax: In Go, interface definitions use the interface keyword followed by a set of method signatures. C# interface definitions use the interface keyword followed by a set of method signatures enclosed in braces.
- Implicit Implementation: In Go, interface implementation is implicit. If a type satisfies all the methods of an interface, it is considered to implement the interface. In C#, interface implementation is explicit and must be declared using the class : interface syntax.
- Single Implementation: Go interfaces support implicit implementation, allowing a single type to implement multiple interfaces simultaneously. In C#, a class can explicitly implement multiple interfaces, but each interface must be implemented separately.
- Interface Composition: Go supports interface composition, where one interface can include other interfaces as embedded fields. This allows for creating new interfaces by composing existing ones. C# does not support interface composition; each interface must be explicitly implemented.
- Nullability: In C#, interfaces can be nullable or non-nullable, depending on their use. Go interfaces are always nullable, as the zero-value of an interface is nil.
- Type System: Go interfaces are based on structural typing, meaning a type is considered to implement an interface if it has the same method signatures. C# interfaces are based on nominal typing, requiring explicit declaration of interface implementation.
These are some of the key differences between Go interfaces and C# interfaces, showcasing the different design philosophies and language features of each programming language.
What is the recommended IDE for C# development?
The recommended IDE (Integrated Development Environment) for C# development is Visual Studio. Visual Studio is a powerful IDE developed by Microsoft and provides excellent features and tools for C# development, including code completion, debugging capabilities, extensive libraries and frameworks, and a user-friendly interface. Visual Studio offers both a paid version (Visual Studio Professional or Enterprise) and a free version called Visual Studio Community, with the latter being sufficient for most developers' needs. Additionally, alternatives like JetBrains Rider and Xamarin Studio (for cross-platform development) are also popular among C# developers.
How to handle database operations in C#?
To handle database operations in C#, you can use the following steps:
- Install and import the required libraries: Install the required libraries for database access like Entity Framework or ADO.NET. Then, import the necessary namespaces in your C# file to access the classes and methods.
- Establish a database connection: Create a connection string by specifying the connection properties such as server name, database name, credentials, etc. Use this connection string to establish a connection to the database. Using Entity Framework: In Entity Framework, you can create a DbContext class derived from the DbContext base class and configure the connection string in the constructor or using the App.config or Web.config file. Using ADO.NET: In ADO.NET, create a SqlConnection instance by passing the connection string and then call the Open() method to open the connection.
- Execute SQL queries or commands: Use SQL queries or commands to perform various operations like SELECT, INSERT, UPDATE, DELETE. Using Entity Framework: Entity Framework provides LINQ to Entities for querying the data. You can write LINQ queries on DbSet or Queryable collections to retrieve and manipulate data. You can also use methods like Add(), Update(), Remove() to perform insert, update, and delete operations. Using ADO.NET: ADO.NET provides SqlCommand class for executing SQL queries or commands. Instantiate a SqlCommand object, set the SQL query or command, execute it using ExecuteNonQuery() for insert, update, delete operations, or ExecuteReader() for select queries.
- Close the database connection: After performing the required database operations, close the database connection. Using Entity Framework: The DbContext class manages the connection automatically. However, you can call the Dispose() method on the DbContext instance to close the connection explicitly. Using ADO.NET: Call the Close() method on the SqlConnection instance to close the connection.
It is recommended to use ORM frameworks like Entity Framework which provide a higher level of abstraction and easier database operations compared to raw ADO.NET.