
Best Mocha Installation Tools to Buy in July 2026

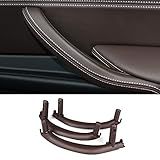
CHUANGHUI Car Door Handle for BMW X5 X6 E71 E70 2007-2013 Interior Door Handles Replace Cover Car Door Handle Accessories (Mocha Brown)
- PREMIUM ABS+PC & TPU FINISH: RESISTS SCRATCHING & ABRASION.
- REFRESH YOUR BMW'S INTERIOR: RESTORES HANDLES TO LIKE-NEW CONDITION.
- PERFECT FIT: CUSTOMIZED FOR BMW X5 E70 & X6 E71, EASY INSTALL!


CHUANGHUI Car Door Handles for BMW X5 X6 F15 F16 2014-2018 Interior Door Handles Replace Cover Car Door Pull Handle Accessories (Mocha Brown)
-
PREMIUM ABS+PC & TPU FOR ULTIMATE SCRATCH PROTECTION.
-
REVIVE YOUR CAR'S LOOK: REPLACE WORN DOOR HANDLES EFFORTLESSLY.
-
PERFECT FIT FOR BMW X5 & X6 WITH 1:1 MOLD PRECISION.
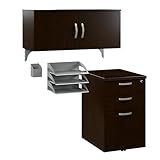
Bush Business Furniture Office in an Hour Storage Cabinet with Accessories in Mocha Cherry
- VERSATILE STORAGE CABINET MOUNTS LEFT OR RIGHT FOR CONVENIENCE.
- FULLY ASSEMBLED CABINET SAVES TIME FOR INSTANT SETUP.
- ANSI/BIFMA CERTIFIED FOR TOP-NOTCH PERFORMANCE AND SAFETY.
![VELVET CAVIAR Checkered Phone Case for iPhone 16 Pro Max - Compatible with MagSafe [10ft Drop Tested] - Cute Protective Cover for Women - Mocha Brown Black](https://cdn.blogweb.me/1/41_GO_1_A8io_BL_SL_160_06df929538.jpg)
VELVET CAVIAR Checkered Phone Case for iPhone 16 Pro Max - Compatible with MagSafe [10ft Drop Tested] - Cute Protective Cover for Women - Mocha Brown Black
- SLEEK IPHONE 16 PRO MAX CASE WITH 1-YEAR WARRANTY INCLUDED!
- SEAMLESS MAGSAFE COMPATIBILITY FOR EASY WIRELESS CHARGING.
- STUNNING DESIGNS CRAFTED IN NYC, COMBINING STYLE AND DURABILITY!
![RAPTIC Shield for iPhone 16 Pro Max Case, [for 2024 Capture Button Shockproof Protective Clear Case], Military Grade 13ft Drop Tested, Durable Aluminum Frame, Anti-Yellowing Case, 6.9 inch, Mocha](https://cdn.blogweb.me/1/417_YV_8r_UZDL_SL_160_6fa254dc4b.jpg)
RAPTIC Shield for iPhone 16 Pro Max Case, [for 2024 Capture Button Shockproof Protective Clear Case], Military Grade 13ft Drop Tested, Durable Aluminum Frame, Anti-Yellowing Case, 6.9 inch, Mocha
- MILITARY-GRADE PROTECTION: SURVIVES DROPS UP TO 13 FEET (4M)
- SHOCK-ABSORBING DESIGN WITH ALUMINUM & RUBBER FOR ULTIMATE DURABILITY
- COMPATIBLE WITH WIRELESS CHARGING & FEATURES ANTI-FINGERPRINT COATING

VELVET CAVIAR Checkered Phone Case for iPhone 15 Pro Max - Compatible with MagSafe - 10ft Drop Tested - Cute Protective Cover for Women - Mocha Brown Black
-
SEAMLESS MAGSAFE CHARGING: EASILY SWITCH MAGNETIC ACCESSORIES WITH EASE.
-
STYLISH NYC DESIGN: JOIN MILLIONS WITH OUR ARTIST-DESIGNED PHONE CASES.
-
ULTIMATE PROTECTION: DROP TESTED UP TO 10FT; PROTECTS SCREEN AND CAMERA.
![RAPTIC Shield Magnetic for iPhone 16 Pro Max Case, Compatible with MagSafe, [for 2024 Capture Button Shockproof Clear Case], Military Grade 13FT Drop Tested, Durable Aluminum Frame, 6.9 inch, Mocha](https://cdn.blogweb.me/1/41_JU_Vn_N_Nq_EL_SL_160_73b1cece0c.jpg)
RAPTIC Shield Magnetic for iPhone 16 Pro Max Case, Compatible with MagSafe, [for 2024 Capture Button Shockproof Clear Case], Military Grade 13FT Drop Tested, Durable Aluminum Frame, 6.9 inch, Mocha
-
SHOCKPROOF DESIGN EXCEEDS MILITARY DROP STANDARDS FOR ULTIMATE PROTECTION!
-
MACHINED ALUMINUM & BUBBLE LINING ABSORB IMPACTS FOR RUGGED DURABILITY!
-
EFFICIENT MAGNET ALIGNMENT ENSURES FAST CHARGING & SECURE CONNECTIONS!
To install and run Mocha, you first need to have Node.js installed on your system. Mocha is a testing framework that is typically used with Node.js projects to run tests on your code.
To install Mocha, you can use npm (Node Package Manager) by running the command npm install --global mocha in your terminal. This will install Mocha globally on your system, so you can use it from any directory.
Once Mocha is installed, you can create your test files with the .test.js or .spec.js extension, and write your test cases using Mocha's syntax. To run your tests, you can use the command mocha followed by the path to your test file.
Mocha will then run your tests and provide you with the results, including any failing test cases. You can also use Mocha's built-in reporters to display the results in different formats, such as spec, dot, or tap.
Overall, Mocha is a powerful testing framework that is widely used in the Node.js community for writing and running tests for your code.
How to integrate mocha with CI/CD pipelines?
Integrating Mocha with CI/CD pipelines involves incorporating Mocha test scripts within your existing CI/CD workflow. Here are the general steps to integrate Mocha with CI/CD pipelines:
- Setup Mocha: Make sure you have Mocha installed in your project. You can install Mocha using npm by running npm install --save-dev mocha.
- Write Test Scripts: Write your test scripts using Mocha. You can create test files with .test.js or .spec.js extensions and write your test cases using Mocha's test syntax.
- Setup CI/CD Pipeline: Configure your CI/CD pipeline to run your Mocha test scripts as part of the build process. Depending on the CI/CD tool you are using (e.g., Jenkins, Travis CI, CircleCI), you can add a step in your pipeline configuration file to run Mocha tests.
- Add Test Commands: In your pipeline configuration file, add commands to run Mocha tests. For example, you can use npm scripts to run Mocha tests, such as npm run test.
- Set Test Coverage Reporting: If you want to track test coverage, you can use tools like Istanbul or nyc to generate coverage reports. Add the necessary commands to your pipeline configuration file to generate and publish test coverage reports.
- Monitor Test Results: Monitor the test results in your CI/CD pipeline to ensure that all tests are passing. If any tests fail, the pipeline should fail, preventing the deployment of faulty code.
By following these steps, you can seamlessly integrate Mocha test scripts with your CI/CD pipelines, ensuring that your code is thoroughly tested before deployment.
How to install mocha locally in a project?
To install Mocha locally in a project, you can follow these steps:
- Open your project's directory in your terminal.
- Run the following command to install Mocha as a development dependency using npm:
npm install mocha --save-dev
This command will add Mocha to your project's package.json file and install it in the node_modules directory.
- You can now create a test script in your package.json file to run Mocha tests. Add a script like the following to your package.json file:
"scripts": { "test": "mocha" }
- Create your test files with the .test.js or .spec.js extension in your project directory.
- To run your Mocha tests, simply run the following command in your terminal:
npm test
This will execute Mocha and run all your test files.
That's it! You have successfully installed Mocha locally in your project and can start writing and running tests using Mocha.
What is the difference between before() and beforeEach() hooks in mocha?
In Mocha, before() and beforeEach() are both hooks used for setting up the test environment before running tests, but they have some key differences:
- before(): The before() hook is executed once before all the tests in a test suite (describe block). It is typically used for setting up the environment that will be shared among all the tests in the suite.
- beforeEach(): The beforeEach() hook is executed before each test case in a test suite. It is used to set up the environment for each individual test case, ensuring that the tests are isolated from each other.
In summary, before() is executed once before all the tests, while beforeEach() is executed before each test.
How to use mocha with Babel for ES6 support?
To use Mocha with Babel for ES6 support, you will need to do the following:
- Install the necessary dependencies:
npm install mocha @babel/register @babel/preset-env --save-dev
- Create a .babelrc file in your project root directory with the following configuration:
{ "presets": ["@babel/preset-env"] }
- Create a test file with ES6 syntax. For example, you can create a file named test.js with the following content:
import assert from 'assert';
describe('Array', function() { describe('#indexOf()', function() { it('should return -1 when the value is not present', function() { assert.strictEqual([1, 2, 3].indexOf(4), -1); }); }); });
- Update your package.json file to include a script for running Mocha tests with Babel:
"scripts": { "test": "mocha --require @babel/register" }
- Run your Mocha tests by executing the following command in your terminal:
npm test
Now, Mocha will be able to run your tests written in ES6 syntax by transpiling them using Babel.
How to use the --slow flag in mocha for slow test detection?
To use the --slow flag in Mocha for slow test detection, you need to specify a threshold value in milliseconds to determine which tests are considered slow. The flag can be used in the command line when running Mocha tests.
For example, to run Mocha tests with the --slow flag set to 1000 milliseconds:
mocha --slow 1000
This command will run the tests and mark any tests that take longer than 1000 milliseconds as slow tests. You can adjust the threshold value to suit your specific needs.
You can also set the threshold value in your Mocha configuration file (typically mocha.opts or package.json), like this:
{ "slow": 1000 }
This will set the default threshold value for all tests in your test suite to 1000 milliseconds.
When running tests with the --slow flag, Mocha will display a list of slow tests in the test results, making it easier for you to identify and optimize any performance bottlenecks in your code.
How to install and use chai with mocha for assertion testing?
To install and use Chai with Mocha for assertion testing, follow these steps:
- Install Chai and Mocha via npm:
npm install chai mocha --save-dev
- Create a test file (e.g., test.js) and require Chai and Mocha:
const chai = require('chai'); const expect = chai.expect; const assert = chai.assert; const should = chai.should();
- Write your test cases using Chai's assertion methods. Here are a few examples:
describe('Array', function() { it('should return -1 when the value is not present', function() { assert.equal([1,2,3].indexOf(4), -1); });
it('should contain 3 elements', function() { expect([1,2,3]).to.have.lengthOf(3); });
it('should not be empty', function() { [1,2,3].should.not.be.empty; }); });
- Run your test file using Mocha:
mocha test.js
You should see the test results displayed in the terminal. If any of the assertions fail, Mocha will output the failed test cases.
That's it! You have successfully installed and used Chai with Mocha for assertion testing. Remember to import Chai in your test files and write test cases using Chai's assertion methods to ensure your code behaves as expected.